Last time I visited this topic, I was met with some challenges! It took a lot of manual crafting to get the OpenTelemetry Collector configured correctly, both for receiving observability data as for sending it to Grafana Cloud.
Although it worked, it was far from ideal.
But Microsoft is not standing still and just recently they announced the Managed OpenTelemetry Agent for Azure Container Apps. This agent is a managed service, that can be used to collect telemetry data from your applications that reside in your Azure Container Apps Environment and send it to Azure Monitor or any other OTLP endpoint.
The huge gain here; due to the fact that it is a managed service; is that you only need to add a configuration section to your ACA setup and the agent will be automatically deployed, configured and maintained for you.
Note The Managed OpenTelemetry Agent is currently still in preview.
Next to that, we also got a new development stack called .NET Aspire. It provides a consistent, opinionated set of tools and patterns that help you build and run distributed apps.
On top of that it also incorporates extensions to enable observability with OpenTelemetry in any .NET application. Running your solution locally will even give you a full overview dashboard, showing you everything from logs, traces, metrics.
Note The .NET Aspire stack is currently still in preview.
So let’s see how we can use the Managed OpenTelemetry Agent in combination with the .NET Aspire stack to get a full observability setup running on Azure Container Apps.
.NET Aspire
The easiest way to get started, is by following the great Microsoft Learn quickstart for building your first .NET Aspire app. It will give you a Blazor web app that talks to a .NET Core Web API, both preconfigured with OpenTelemetry.
I will not dive to deeply into this part, because the main focus of this blog post is to get this setup running on Azure Container Apps with the Managed OpenTelemetry Agent. There are a ton of great other resources available to get you more deep dive info on the .NET Aspire stack.
What I will highlight though, is where you can find the OpenTelemetry setup. If you open the ApiService project or the Web, you will find a Program.cs file that contains the following code:
1
2
|
// Add service defaults & Aspire components.
builder.AddServiceDefaults();
|
This line of code will use the Aspire extensions to add the OpenTelemetry components to your application. It will even add more than that, but for now we will focus on the OpenTelemetry part.
If you drill down into the AddServiceDefaults method, you will find the following code:
1
|
builder.ConfigureOpenTelemetry();
|
This points to the ConfigureOpenTelemetry method that will setup logging, metrics and tracing for you through use of the OpenTelemetry SDK.
 1
 2
 3
 4
 5
 6
 7
 8
 9
10
11
12
13
14
15
16
17
18
19
20
21
22
23
24
25
26
27
|
public static IHostApplicationBuilder ConfigureOpenTelemetry(this IHostApplicationBuilder builder)
{
    builder.Logging.AddOpenTelemetry(logging =>
    {
        logging.IncludeFormattedMessage = true;
        logging.IncludeScopes = true;
    });

    builder.Services.AddOpenTelemetry()
        .WithMetrics(metrics =>
        {
            metrics.AddAspNetCoreInstrumentation()
                .AddHttpClientInstrumentation()
                .AddRuntimeInstrumentation();
        })
        .WithTracing(tracing =>
        {
            tracing.AddAspNetCoreInstrumentation()
                // Uncomment the following line to enable gRPC instrumentation (requires the OpenTelemetry.Instrumentation.GrpcNetClient package)
                //.AddGrpcClientInstrumentation()
                .AddHttpClientInstrumentation();
        });

    builder.AddOpenTelemetryExporters();

    return builder;
}
|
It is good to remember this, because if needed, you can always extend this setup.
Now that we have a working .NET Aspire app, we can start to containerize it and ship it to Azure Container Apps.
To make it even more interesting, we will do this through Azure DevOps.
DotNet Publish and Azure Container Registry
There are several ways to containerize a .NET app, but I chose to use dotnet publish. It allows us to create a docker container image of our application and publish it to a container registry in one go!
Details on how to construct the correct command line syntax can be found on Microsoft Learn here.
With the information presented on the Microsoft Learn page, I created an Azure Devops YAML pipeline task that will build the .NET Aspire app, containerize it and push it to an Azure Container Registry.
The pipeline task for the ApiService looks like this ( the web task is similar ):
 1
 2
 3
 4
 5
 6
 7
 8
 9
10
11
12
13
14
15
16
17
18
|
- task: DotNetCoreCLI@2
  displayName: 'dotnet publish'
  inputs:
    command: 'publish'
    publishWebProjects: false
    zipAfterPublish: false
    projects: './src/ACAObservability.ApiService/ACAObservability.ApiService.csproj'
    arguments: >-
      -p:PublishProfile="DefaultContainer"
      -p:PublishSingleFile="true"
      -p:PublishTrimmed="false"
      --self-contained "true"
      --verbosity "quiet"
      --nologo
      -r "linux-amd64"
      -p:ContainerRepository="acaobservability.api"
      -p:ContainerImageTags="\"$(dockerImageTag);latest\""
      -p:ContainerRegistry=yourawesomecontaineregistry.azurecr.io
|
Some important things to note here:
- Remember to change this yourawesomecontaineregistry.azurecr.io to the name of your Azure Container Registry
- Be sure to use the correct desired image runtime, when deploying to Azure Container Registry it should be -r “linux-amd64”
Also before you can actually publish to the Azure Container Registry, you need to login to it. This can also be done with a Azure DevOps pipeline task:
1
2
3
4
5
|
- task: Docker@2
  displayName: Login to ACR
  inputs:
    command: login
    containerRegistry: $(containerRegistryServiceConnection)
|
This task must be placed before the dotnet publish task!
Also not that you will first need to create a specific service connection, of the type Docker Registry, to your Azure Container Registry. This can be done in the Azure DevOps project settings.
If everything went well, you should now have container images in your Azure Container Registry.
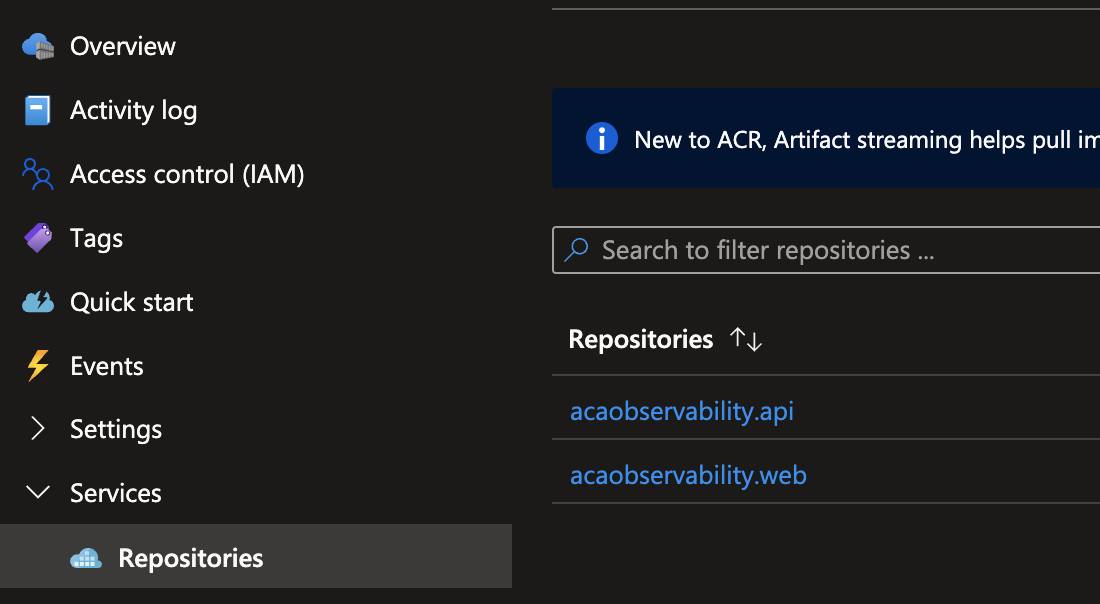
Azure Container Apps and Bicep
Last item on the agenda is to deploy the container images to Azure Container Apps. For this we will use Bicep, this allows us to define the infrastructure as code and again use Azure DevOps to deploy it.
The Devop YAML task to use Bicep as deployment resource looks like this:
 1
 2
 3
 4
 5
 6
 7
 8
 9
10
11
12
13
14
15
16
17
18
19
20
21
22
23
24
25
26
27
28
29
30
31
32
|
trigger: none

pool:
  vmImage: ubuntu-latest

variables:
  serviceConnection: 'Azure service connection'
  subscriptionId: 'subscriptionId'
  templateFile: './.infra/main.bicep'
  templateParametersFile: './.infra/main.parameters.dev.json'

stages:
- stage: DeployInfrastructurePart2
  displayName: 'Deploy infrastructure'
  jobs:
  - job: DeployBicep
    displayName: 'Job - Deploy infrastructure through Bicep'
    steps:
    - task: AzureResourceManagerTemplateDeployment@3
      displayName: 'Task - Deploy infrastructure through Bicep'
      inputs:
        deploymentScope: 'Subscription'
        subscriptionId: $(subscriptionId)
        azureResourceManagerConnection: $(serviceConnection)
        location: 'westeurope'
        action: 'Create Or Update Resource Group'
        templateLocation: 'Linked artifact'
        csmFile: '$(templateFile)'
        csmParametersFile: '$(templateParametersFile)'
        overrideParameters: -azureContainerRegistryPassword $(azureContainerRegistryPassword)
        deploymentMode: Incremental
        deploymentName: 'DeployPipelineTemplate'
|
Again, be sure to change the subscriptionId variable, to your own subscription id.
The actual task will use the main.bicep file together with the main.parameters.dev.json file to deploy the Azure Container Apps setup. To allow the deployment to access the Azure Container Registry, you will need to provide the password as a parameter, as you can see in the overrideParameters section.
The password can be found on the Container Registry in the Access keys section, the bicep file has the correct user name set. It will be the same as the registry name per default.
The main bicep file is not that complex, but if uses a submodule that contains the majority of the setup. The main bicep file looks like this:
 1
 2
 3
 4
 5
 6
 7
 8
 9
10
11
12
13
14
15
16
17
18
19
20
21
22
23
24
25
26
27
28
29
30
31
|
targetScope = 'subscription'

@allowed([
  'dev', 'tst', 'acc', 'prd'
])
param env string = 'dev'

param projectName string
param resourceLocationLong string
param resourceLocationShort string
param moduleNameAca string = 'aca${projectName}'

@secure()
param azureContainerRegistryPassword string = ''

// Create a resource group
resource rg 'Microsoft.Resources/resourceGroups@2023-07-01' = {
  name: 'rg-${env}-${resourceLocationShort}-${projectName}'
  location: resourceLocationLong
}

module acaModule 'modules/ca.module.bicep' = {
  name: moduleNameAca
  params: {
    env: env
    projectName: projectName
    resourceLocationShort: resourceLocationShort
    azureContainerRegistryPassword: azureContainerRegistryPassword
  }
  scope: rg
}
|
The submodule ca.module.bicep contains the actual setup for the Azure Container Apps. It will create the necessary resources, like the Azure Container Apps, the Managed OpenTelemetry Agent and the necessary configuration to get it all running.
The submodule bicep file looks like this:
  1
  2
  3
  4
  5
  6
  7
  8
  9
 10
 11
 12
 13
 14
 15
 16
 17
 18
 19
 20
 21
 22
 23
 24
 25
 26
 27
 28
 29
 30
 31
 32
 33
 34
 35
 36
 37
 38
 39
 40
 41
 42
 43
 44
 45
 46
 47
 48
 49
 50
 51
 52
 53
 54
 55
 56
 57
 58
 59
 60
 61
 62
 63
 64
 65
 66
 67
 68
 69
 70
 71
 72
 73
 74
 75
 76
 77
 78
 79
 80
 81
 82
 83
 84
 85
 86
 87
 88
 89
 90
 91
 92
 93
 94
 95
 96
 97
 98
 99
100
101
102
103
104
105
106
107
108
109
110
111
112
113
114
115
116
117
118
119
120
121
122
123
124
125
126
127
128
129
130
131
132
133
134
135
136
137
138
139
140
141
142
143
144
145
146
147
148
149
150
151
152
153
154
155
156
157
158
159
160
161
162
163
164
165
166
167
168
169
170
171
172
173
174
175
176
177
178
179
180
181
182
183
184
185
186
187
188
189
190
191
192
193
194
195
|
@allowed([
  'dev', 'tst', 'acc', 'prd'
])
param env string = 'dev'

param projectName string
param resourceLocationLong string = resourceGroup().location
param resourceLocationShort string

param containerRegistryName string = 'yourawesomecontaineregistry'
param imageNameApi string = 'acaobservability.api'
param imageNameWeb string = 'acaobservability.web'

param azureContainerRegistryUsername string = containerRegistryName
@secure()
param azureContainerRegistryPassword string

// Create Azure Log Analytics Workspace
resource logAnalyticsWorkspace 'Microsoft.OperationalInsights/workspaces@2023-09-01' = {
  name: 'log-${env}-${resourceLocationShort}-${projectName}'
  location: resourceLocationLong
  properties: {
    sku: {
      name: 'PerGB2018'
    }
  }
}

resource applicationInsights 'Microsoft.Insights/components@2020-02-02' = {
  name: 'ai-${env}-${resourceLocationShort}-${projectName}'
  location: resourceLocationLong
  kind: 'web'
  properties: {
    Application_Type: 'web'
    Flow_Type: 'Bluefield'
    WorkspaceResourceId: logAnalyticsWorkspace.id
  }
}

// Create Azure Container Apps Environment
// https://learn.microsoft.com/en-us/azure/container-apps/opentelemetry-agents?tabs=arm
resource environment 'Microsoft.App/managedEnvironments@2023-11-02-preview' = {
  name: 'cae-${env}-${resourceLocationShort}-${projectName}'
  location: resourceLocationLong
  properties: {
    appInsightsConfiguration: {
      connectionString: applicationInsights.properties.ConnectionString
    }
    appLogsConfiguration: {
      destination: 'log-analytics'
      logAnalyticsConfiguration: {
          customerId: logAnalyticsWorkspace.properties.customerId
          sharedKey: logAnalyticsWorkspace.listKeys().primarySharedKey
      }
    }
    openTelemetryConfiguration: {
      tracesConfiguration:{
        destinations: ['appInsights']
      }
      logsConfiguration: {
        destinations: ['appInsights']
      }
    }
  }
}

resource containerAppApi 'Microsoft.App/containerApps@2023-05-01' = {
  name: 'ca-${env}-${resourceLocationShort}-api'
  location: resourceLocationLong
  properties: {
    managedEnvironmentId: environment.id
    configuration: {
      secrets: [
        {
          name: 'containerregistrypasswordref'
          value: azureContainerRegistryPassword
        }
      ]
      ingress: {
        external: false
        targetPort: 8080
        transport: 'http'
        allowInsecure: true
      }
      registries: [
        {
          server: '${containerRegistryName}.azurecr.io'
          username: azureContainerRegistryUsername
          passwordSecretRef: 'containerregistrypasswordref'
        }
      ]
    }
    template: {
      containers: [
        {
          image: '${containerRegistryName}.azurecr.io/${imageNameApi}:latest'
          name: 'ca-${env}-${resourceLocationShort}-api'
          resources: {
            cpu: json('0.5')
            memory: '1.0Gi'
          }
          env: [
            {
              name: 'ASPNETCORE_FORWARDEDHEADERS_ENABLED'
              value: 'true'
            }
            {
              name: 'OTEL_DOTNET_EXPERIMENTAL_OTLP_EMIT_EVENT_LOG_ATTRIBUTES'
              value: 'true'
            }
            {
              name: 'OTEL_DOTNET_EXPERIMENTAL_OTLP_EMIT_EXCEPTION_LOG_ATTRIBUTES'
              value: 'true'
            }
            {
              name: 'OTEL_DOTNET_EXPERIMENTAL_OTLP_RETRY'
              value: 'in_memory'
            }
          ]
        }
      ]
      scale: {
        minReplicas: 1
        maxReplicas: 1
      }
    }
  }
}

resource containerAppWeb 'Microsoft.App/containerApps@2023-05-01' = {
  name: 'ca-${env}-${resourceLocationShort}-web'
  location: resourceLocationLong
  properties: {
    managedEnvironmentId: environment.id
    configuration: {
      secrets: [
        {
          name: 'containerregistrypasswordref'
          value: azureContainerRegistryPassword
        }
      ]
      ingress: {
        external: true
        targetPort: 8080
        transport: 'http'
        allowInsecure: false
      }
      registries: [
        {
          server: '${containerRegistryName}.azurecr.io'
          username: azureContainerRegistryUsername
          passwordSecretRef: 'containerregistrypasswordref'
        }
      ]
    }
    template: {
      containers: [
        {
          image: '${containerRegistryName}.azurecr.io/${imageNameWeb}:latest'
          name: 'ca-${env}-${resourceLocationShort}-api'
          resources: {
            cpu: json('0.5')
            memory: '1.0Gi'
          }
          env: [
            {
              name: 'services__apiservice__http__0'
              value: 'http://ca-${env}-${resourceLocationShort}-api'
            }
            {
              name: 'ASPNETCORE_FORWARDEDHEADERS_ENABLED'
              value: 'true'
            }
            {
              name: 'OTEL_DOTNET_EXPERIMENTAL_OTLP_EMIT_EVENT_LOG_ATTRIBUTES'
              value: 'true'
            }
            {
              name: 'OTEL_DOTNET_EXPERIMENTAL_OTLP_EMIT_EXCEPTION_LOG_ATTRIBUTES'
              value: 'true'
            }
            {
              name: 'OTEL_DOTNET_EXPERIMENTAL_OTLP_RETRY'
              value: 'in_memory'
            }
          ]
        }
      ]
      scale: {
        minReplicas: 1
        maxReplicas: 1
      }
    }
  }
}
|
Some important things to note here:
- Remember to change the yourawesomecontaineregistry variable, to the name of your Azure Container Registry
- We took some small shortcuts and did not use variables for the Api and Web image names, but hardcoded them
- To ensure service discovery, we added the services__apiservice__http__0 environment variable to the Web container, so that it can find the Api container
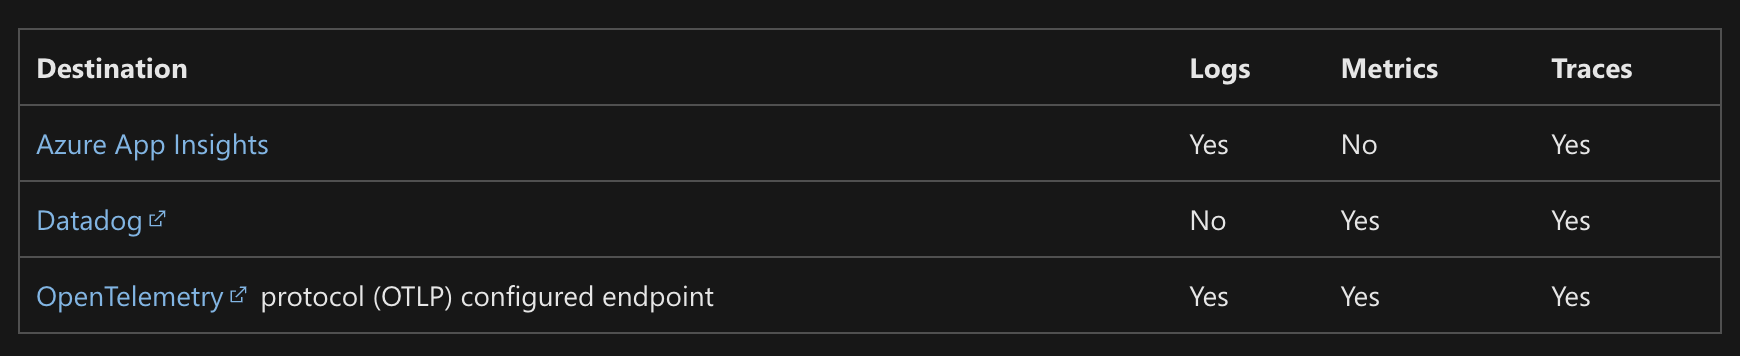
- The setup here, uses the Managed OpenTelemetry Agent to send telemetry data; logs and traces; to Azure Monitor. This is done through the openTelemetryConfiguration section in the environment resource. Metrics are not yet supported by the Managed OpenTelemetry Agent in combination with Azure Monitor ( cfr table below )
When this is all in place, running the Azure DevOps pipeline should result in a full observability setup running on Azure Container Apps.

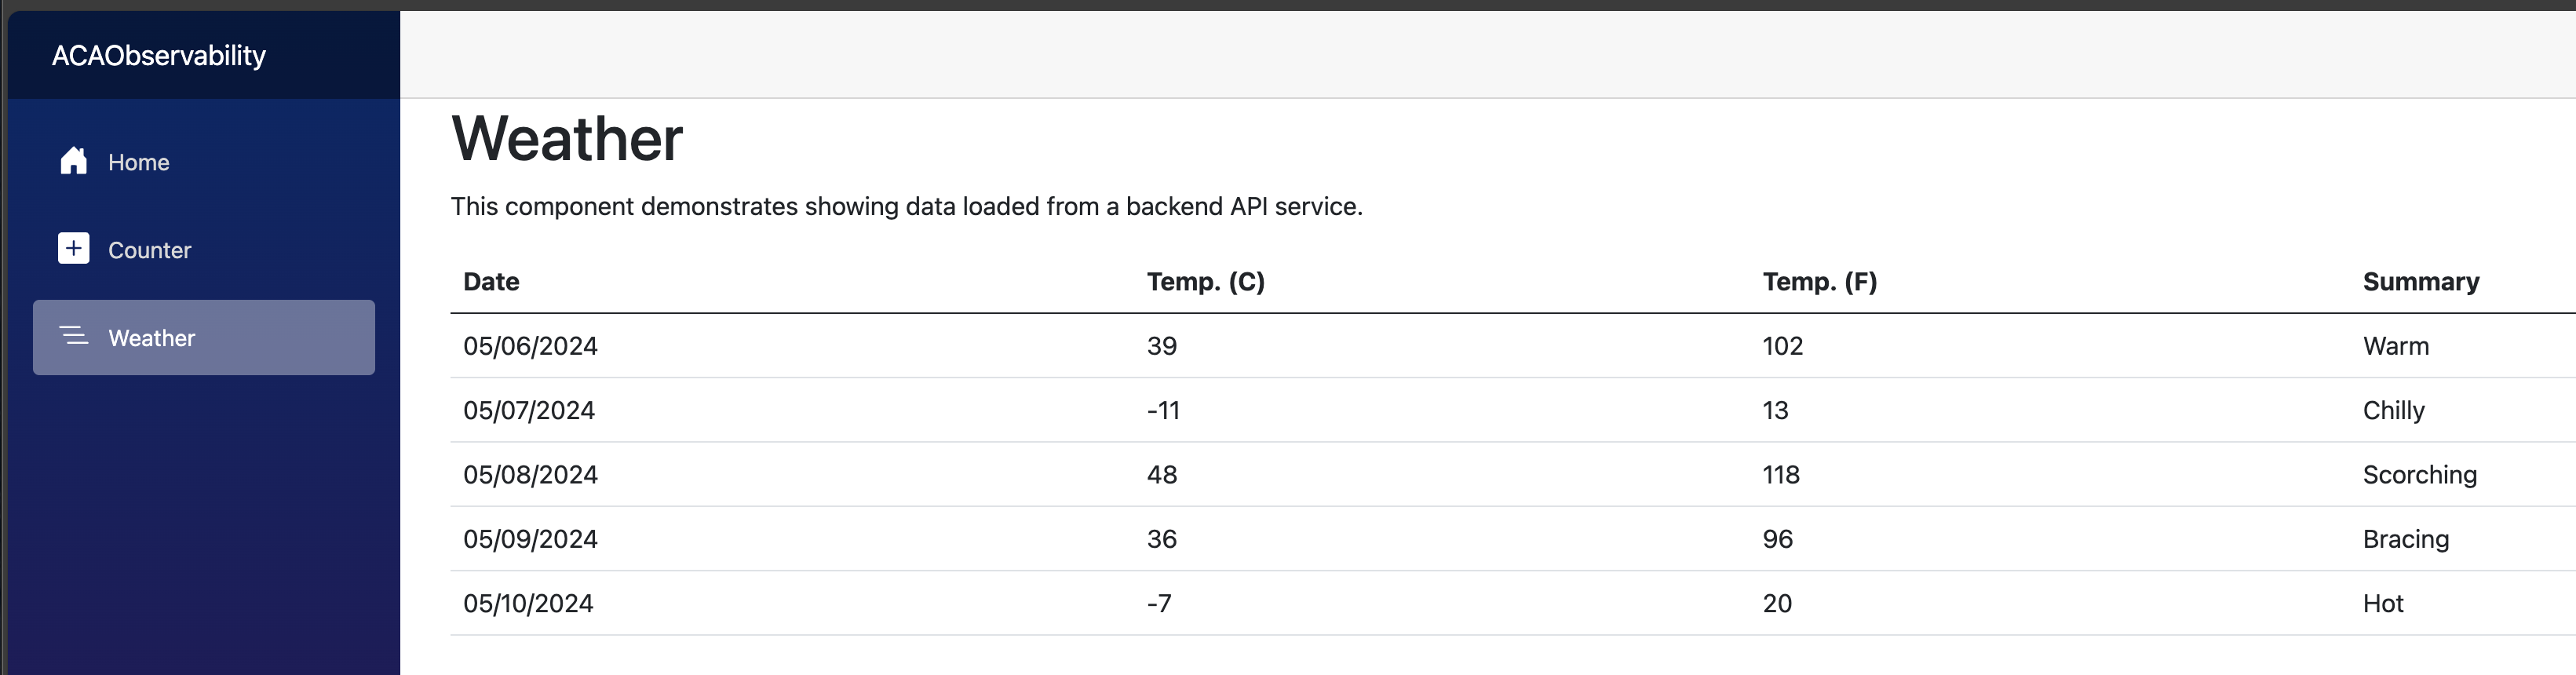
Opening the web container app endpoint will present you with the Blazor web app, that allows you to interact with the .NET Core Web API by calling the /weatherforecast endpoint.
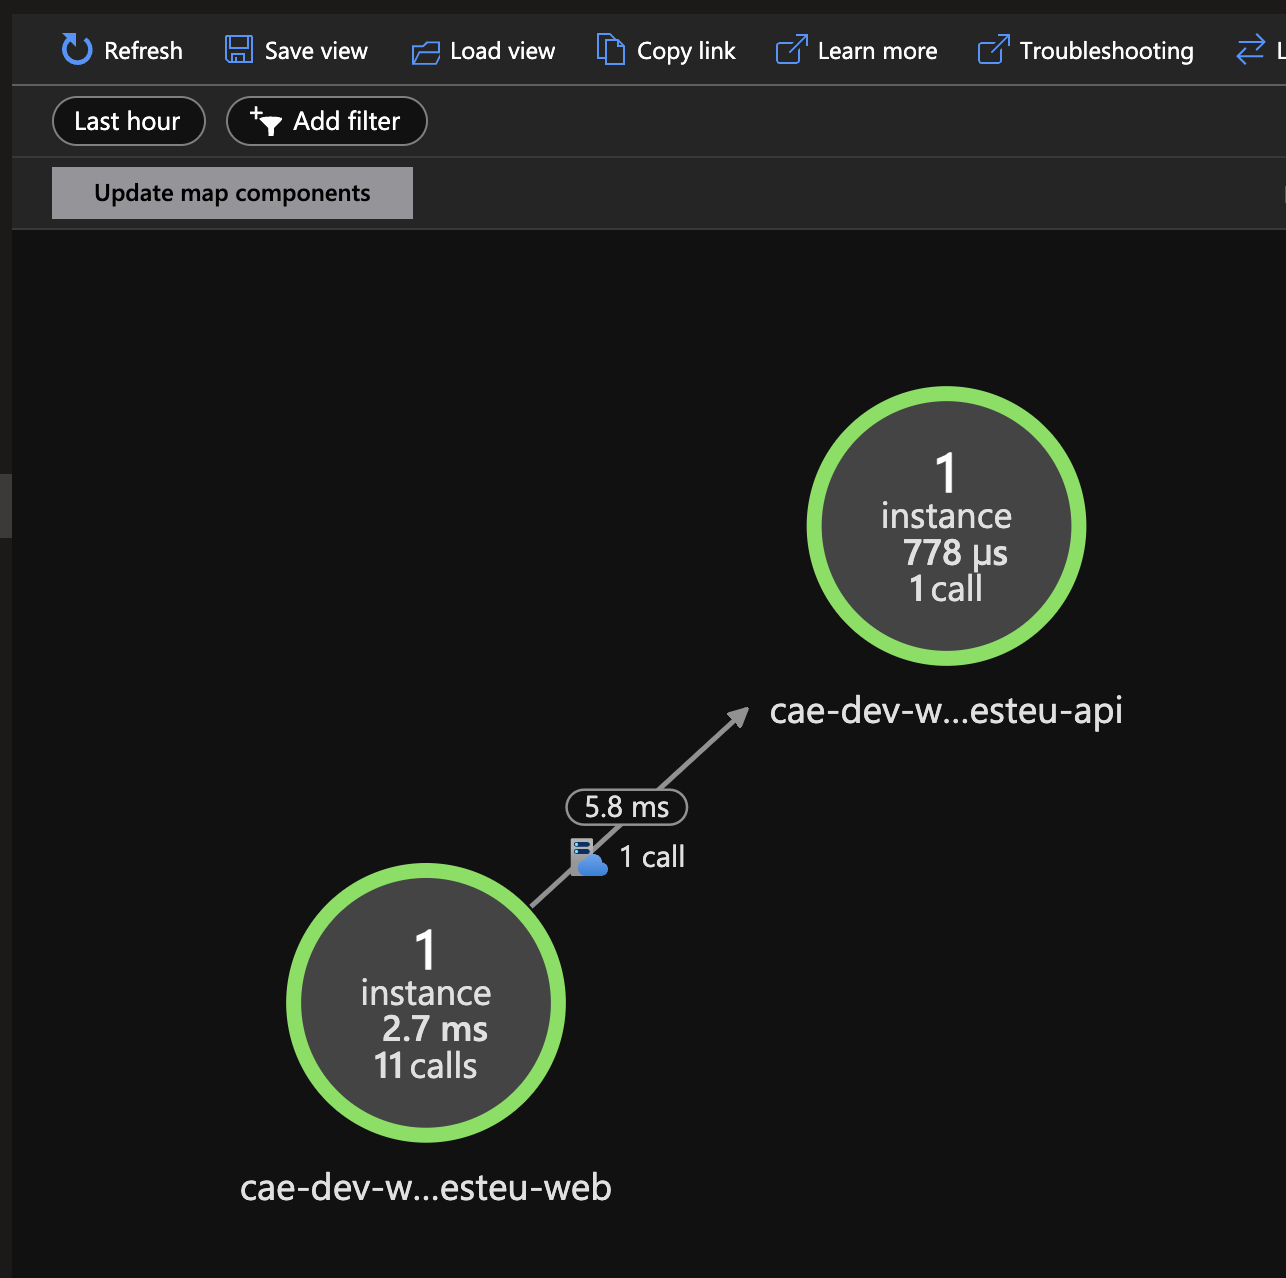
To actually drill down into the observability data, you can use the Azure Monitor section in the Azure Portal. Here you will find the logs and traces that are being sent by the Managed OpenTelemetry Agent. First you can get an overview of the components interaction by looking at the Application Map.
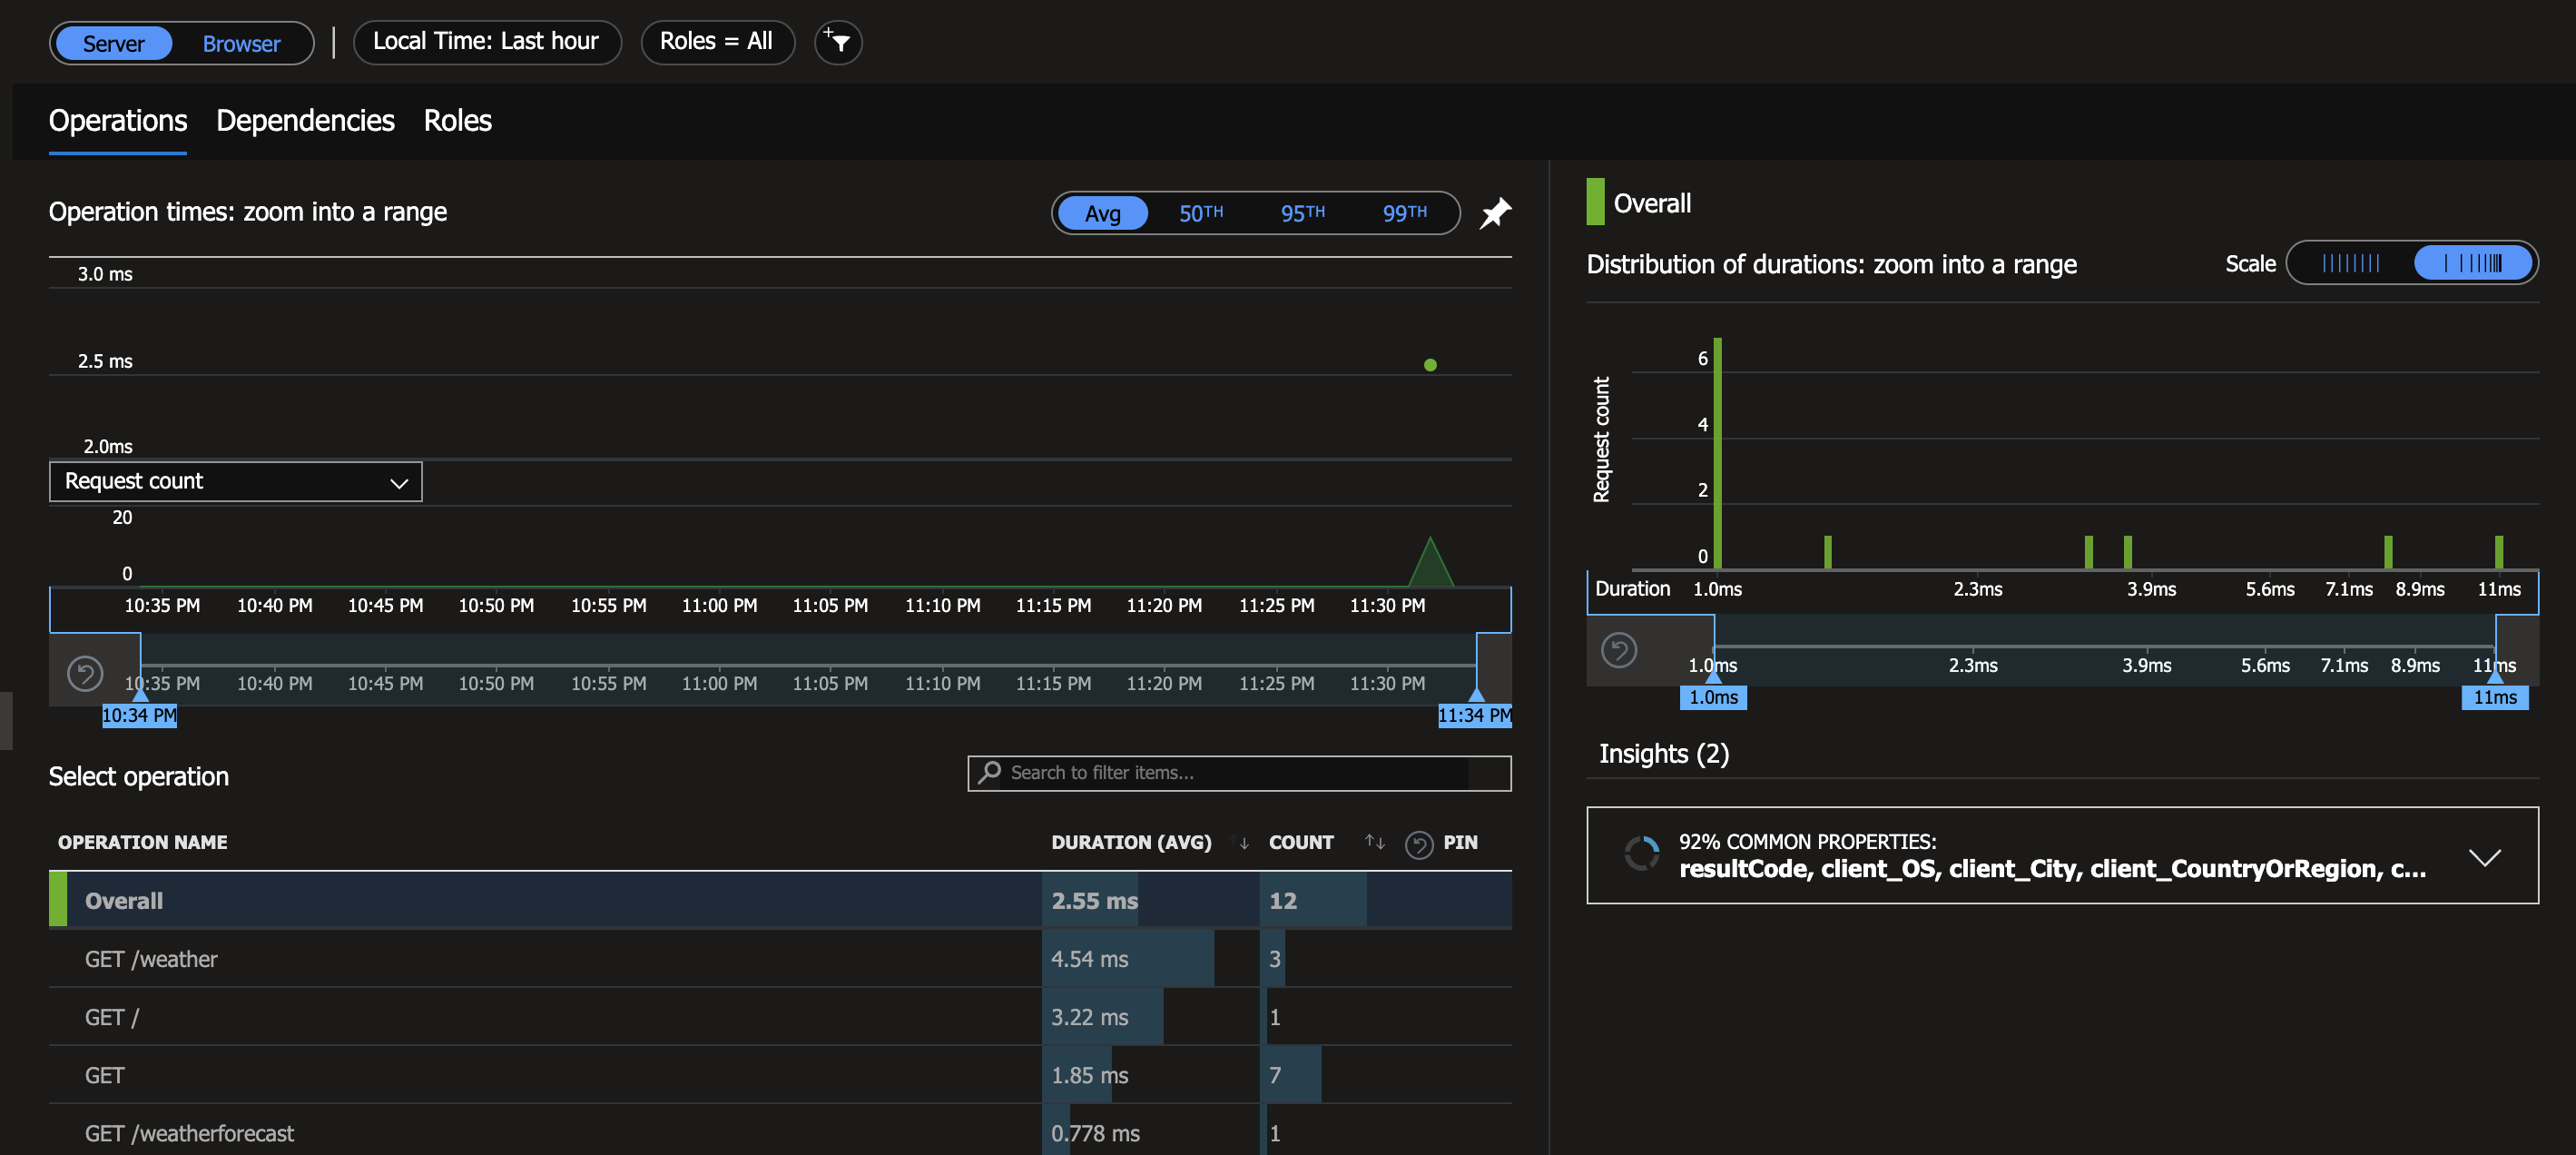
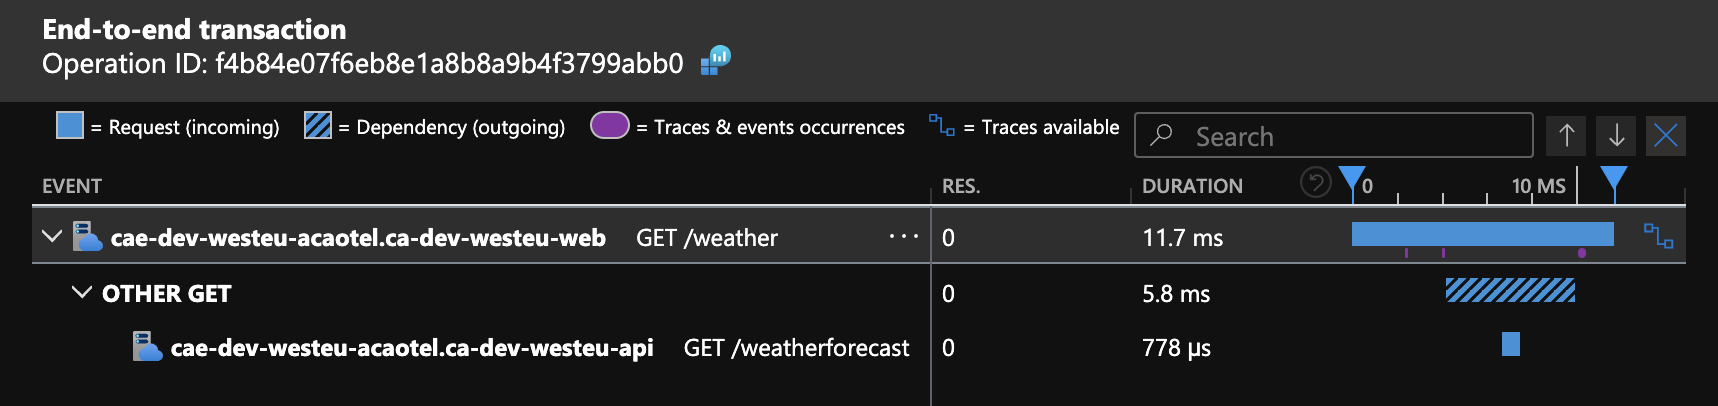
If you open the Performance section, you will find the traces that are being sent by the Managed OpenTelemetry Agent. Here you can drill down into the individual traces and see the details.
Conclusion
As you can see, the Managed OpenTelemetry Agent in combination with the .NET Aspire stack, allows you to get a full observability setup running on Azure Container Apps. Even though the tools are yet still in preview, they are already very powerful and can help you to get a full overview of your application.
And the best part, it is all managed for you, so you can focus on building your application and not on the observability setup!